NHA SND Indicator V1.0 MT4 — Fast, Clean Supply-Demand Zones for Any Pair & Any Timeframe
Tired of cluttered charts and guessing where institutions might step in? If you’ve been hunting for a reliable, no-nonsense way to plot supply and demand (SND) zones on MetaTrader 4—without paying silly money—NHA SND Indicator V1.0 MT4 might be exactly what you were looking for. It draws zones clearly, refreshes them as structure shifts, and helps you plan entries with way less second-guessing. Fewer indicators, more context. Coz context wins.
And yep—this write-up is brought to you by YoForex, the folks behind MQL5.software. We obsess over trader-friendly tools that actually get used in the real world, not just backtest screenshots. Let’s dig in.
Overview
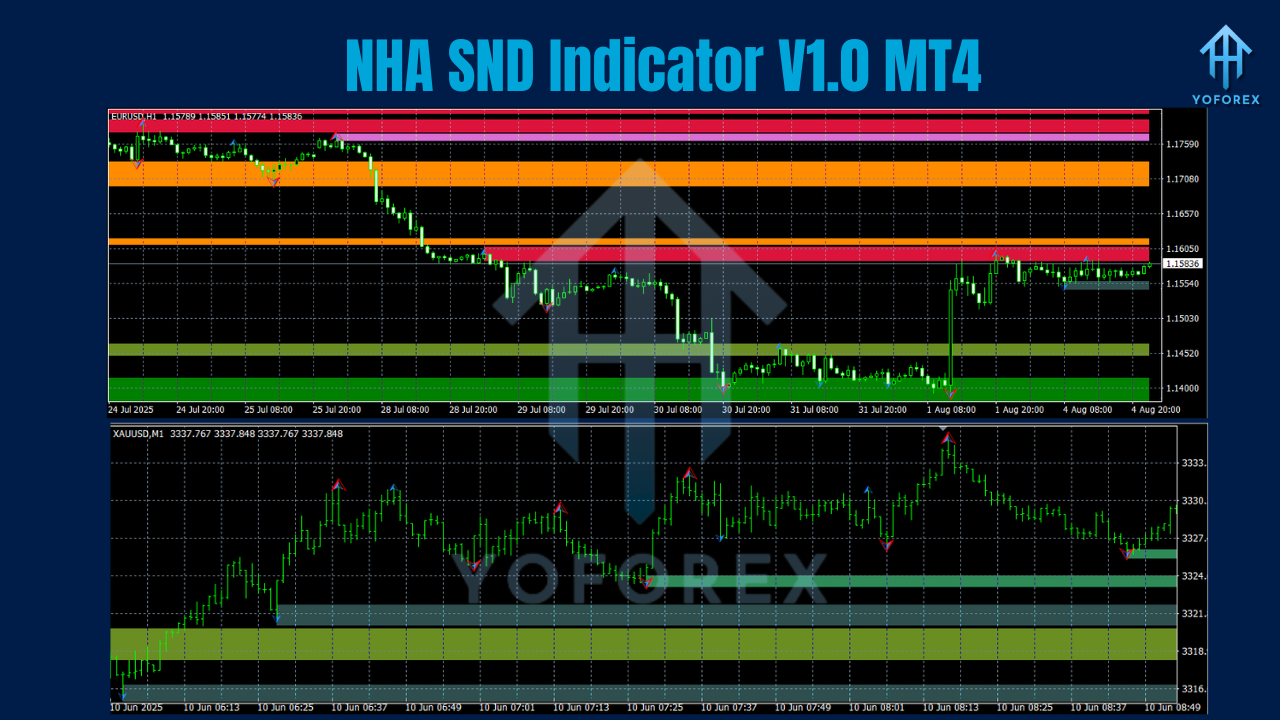
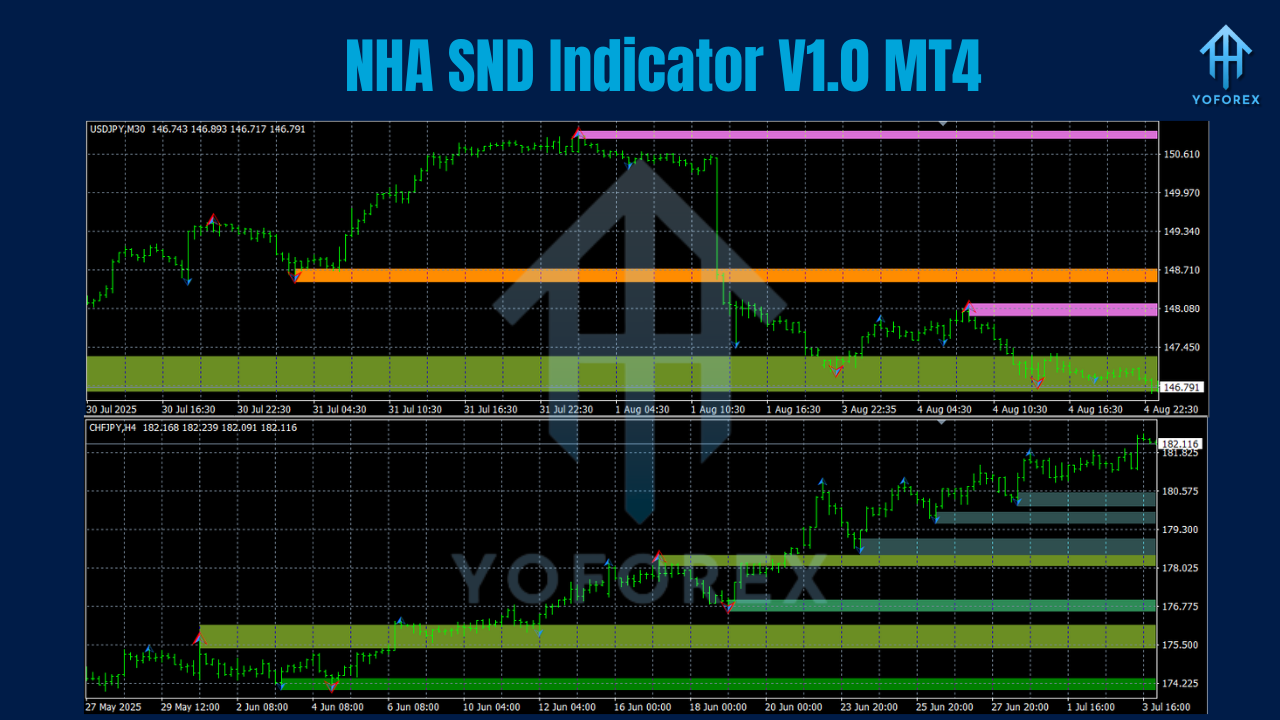
NHA SND Indicator V1.0 MT4 maps Supply & Demand zones automatically across any forex pair and any timeframe. Whether you’re scalping M5 on XAUUSD, intraday on EURUSD M15, or swing-trading GBPUSD H4, the indicator highlights potential institutional footprints—places where price previously reacted, balanced orders, or left imbalances.
Under the hood, it looks for:
- Aggressive impulse moves (often post-news or liquidity sweeps),
- Base candles where price “rested” before a sharp displacement,
- Fair value gaps / imbalance and break of structure (BOS/CHoCH) context,
- Then it anchors refined zones you can plan trades around.
What you get is a cleaner, more objective chart—zones drawn with rules, not vibes. And while no indicator replaces experience, this one shortens the learning curve by removing the messy, subjective stuff.
Built for MT4, it’s light, fast, and doesn’t require special data feeds. Use it standalone, or pair with your favorite confirmation (price action, RSI divergence, EMAs, or even SMC style entry triggers).
Key Features
- Auto-drawn supply & demand zones (fresh + mitigated) with clear color coding
- Works on any pair, any timeframe (majors, minors, metals, indices via CFD)
- Smart zone refinement to avoid huge, untradeable rectangles
- Multi-timeframe awareness so you can align M15 entries with H4 context
- Optional alerts when price taps, breaks, or closes within a zone
- BOS/CHoCH context tags (helpful for SMC-style planning)
- Imbalance (FVG) hinting to spot likely magnets and reaction points
- Auto cleanup of invalidated zones after full mitigation or structure shifts
- Session filters (e.g., focus on London/NY for scalpers)
- Minimal CPU load; optimized for multiple charts
- Clean UI with customizable colors, widths, and label styles
- Exportable set files so you can share presets with your team
How It Works
The NHA SND Indicator scans historical swings and recent volatility to find base-impulse-return sequences—the classic DNA of supply/demand. It notes where price coiled (the base), then launched (displacement candle(s)), and finally returned to “fill” that imbalance. Those bases are where institutional orders likely sat.
When price revisits a zone:
- Wicks and rejections hint at absorption and continuation.
- Full closes deep inside can signal mitigation or invalidation.
- A BOS/CHoCH near the zone adds conviction (e.g., break of prior high while tapping demand).
Because the zones are rules-based, you won’t redraw them five different ways on the same chart depending on mood. That consistency helps you journal and actually improve.
Tip: Pair zones with simple confirmations—engulfing bars, rejection wicks, or LTF structure breaks. You’ll filter out a lot of noise.
Installation & Configuration (MT4)
- Download the indicator file from MQL5.software (search “NHA SND Indicator V1.0 MT4”).
- In MT4, go to File → Open Data Folder.
- Open MQL4 → Indicators and paste the file.
- Restart MT4.
- From Navigator → Indicators, drag “NHA SND Indicator V1.0” onto your chart.
- In Inputs, tweak key settings:
- Zone Depth/Refinement: tight for scalping, wider for swings.
- Lookback Bars: increase for higher timeframes.
- Alert Rules: toggle “touch,” “close in zone,” or “break.”
- Colors/Opacity: keep zones subtle so price action remains readable.
- Save as Template so you can load it on any chart fast.
Recommended starting points:
- Scalpers (M1–M15): smaller zones, tighter refinement, session filters ON.
- Day/Swing traders (M30–H4): moderate zone width, higher lookback, alerts for “close in zone” only.
Practical Playbook (So You Actually Use It)
Top-down mapping. Start on H4 or H1; mark the nearest HTF supply and demand. Drop to M15 or M5 for entries inside those HTF zones. That alignment reduces chop.
Wait for a story. A zone alone isn’t a trade. Add a simple trigger:
- LTF engulfing at the zone,
- Quick liquidity sweep (wick through the level) then close back inside,
- Micro BOS on the entry timeframe.
Risk right. Zones are areas, not sniper lines. Put stops beyond the far side of the zone (not the paint), size down if the zone is wide, and avoid revenge trading if mitigations fail. It happens.
Don’t marry zones. Once a zone is fully mitigated or price builds value inside it, let it go. The indicator helps by auto-cleaning invalidated zones—trust that.
Trade the sessions. If you’re a scalper, focus on London and New York. That’s where displacement is born.
Backtesting & Forward Testing Advice
You can “visual backtest” by scrolling left and watching how zones formed and reacted. But—real talk—forward testing on a demo is where you’ll learn how zones behave when spreads, news, and execution are real. Try a two-week plan:
- Week 1: Only trade touch + LTF confirmation inside HTF zones. Journal screenshots.
- Week 2: Add imbalance fills and BOS filters. Compare win rates and RR.
Expect losing trades (that’s normal), but you’ll likely see cleaner entries, fewer impulsive clicks, and better RR when you wait for confirmation. That’s the whole edge: patience plus context.
Who Should Use NHA SND
- Scalpers who need fast, clean zones without drawing rectangles all day
- Intraday traders who follow session volatility and want objective levels
- Swing traders who build narratives from HTF structure and mitigation
- SMC learners who want visual BOS/CHoCH context with less chart-marking hassle
If you prefer mean-reversion indicators or you trade solely on oscillators, SND might feel “slow” at first. Give it a week—you’ll start seeing why institutions care about where liquidity sits, not just what RSI is doing.
Why YoForex?
Because we ship tools traders actually use. YoForex powers MQL5.software with a simple promise: clean builds, sane defaults, frequent updates, and documentation that doesn’t read like a riddle. We also listen—feature requests often make the roadmap if they help more traders than they hurt. You’ll see that cadence in how swiftly we patch edge cases and refine alerts.
If you like this, check out our other pieces on zone trading and SMART trends in the Indicators section of MQL5.software (internal links below). We keep the ecosystem practical and affordable; no hypey fluff.
Internal Links (Helpful Reads)
- Beginner’s Guide: Supply & Demand on MT4 – foundational concepts and screenshots (MQL5.software)
- How to Build a Top-Down Trading Plan – multi-timeframe mapping tutorial (MQL5.software)
- Best Free MT4/MT5 Tools by YoForex – curated list of indicators & EAs (MQL5.software)
Support
Got questions, stuck on settings, or want a quick preset for your pair? Reach us here:
WhatsApp: https://wa.me/+443300272265
Telegram Group: https://t.me/yoforexrobot
Call to Action
Ready to level up your charting? Download NHA SND Indicator V1.0 MT4 on MQL5.software and start mapping clean, rules-based zones today. Give it a proper week—journal your trades—and you’ll feel the difference in confidence and consistency. Grab it now; your future self will thank you.
YoForex – empowering traders worldwide, one free tool at a time.
Join our Telegram for the latest updates and support


Comments (0)
No comments yet. Be the first to comment!
Leave a Comment